Here are 11 ideas on how to use your childbirth timeline banner (or beadlines).

If you are working in a group setting, I recommend you use the large childbirth/labour timeline banner and for 1:1 work, I recommend the smaller ones and/or beadlines. You can use and adapt any of the activities below to suit a group or 1:1 setting as well as work with the labour/childbirth timeline banners and or beadlines.
To explore how childbirth might unfold
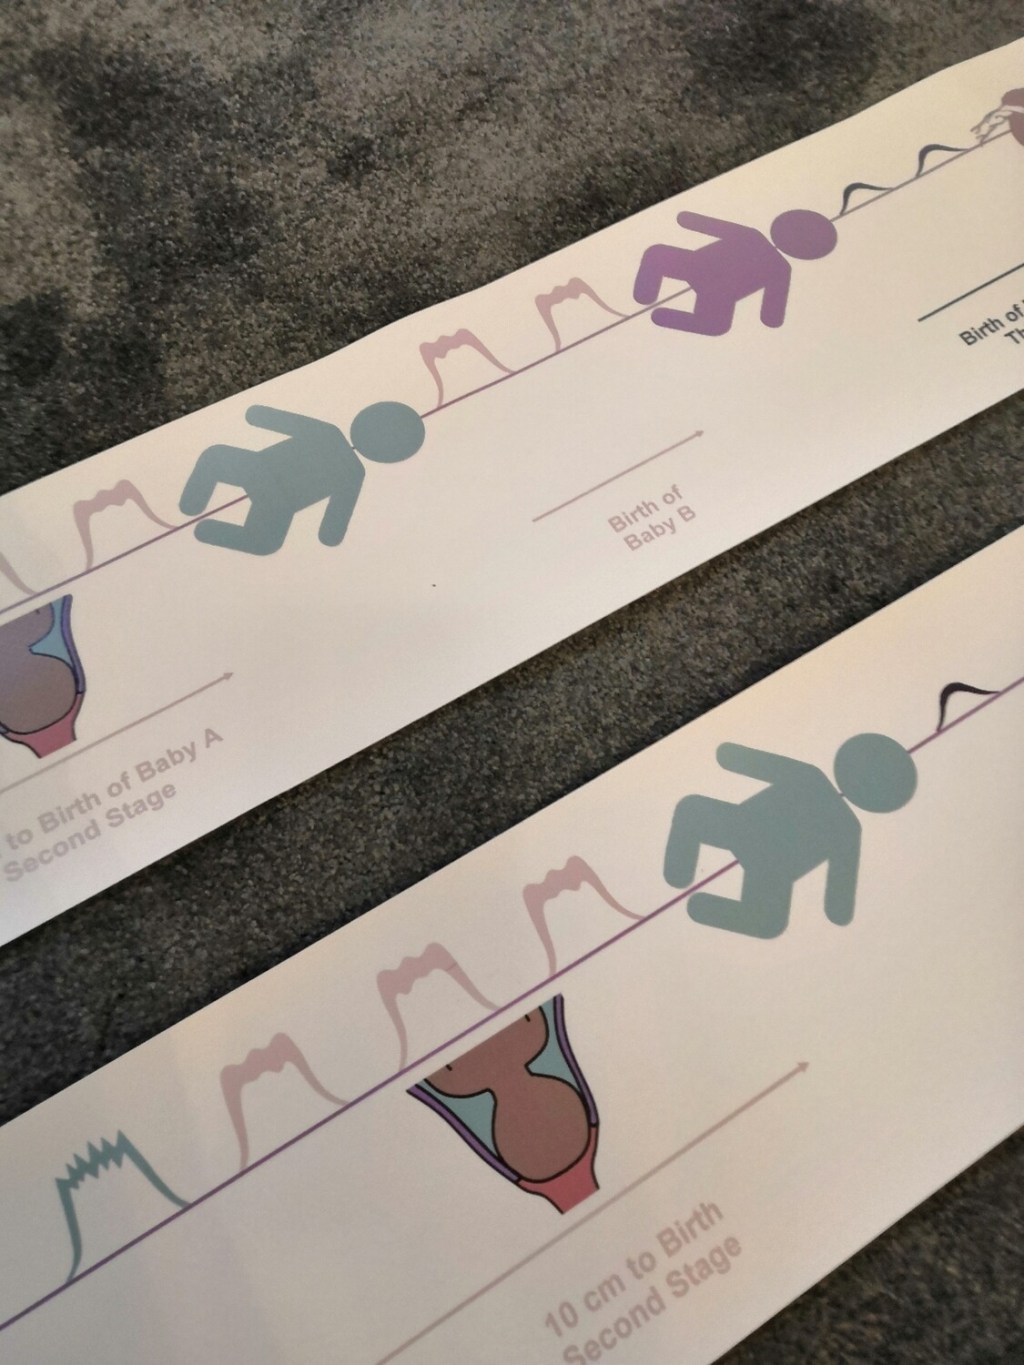
In a group or one-to-one setting or a 1:1 reveal the timeline bit by bit. Starting at the beginning of the birthing journey. You may wish to point out which changes take place internally. How the cervix softens & dilates and how the baby moves. A great visual add-on for this activity are my birth process cards which are also available digitally for you to print your own.

To explore and add comfort measures along the line
Explore different options of medical/pharmaceutical and non-medical comfort measures. While exploring the options, pros and cons you could add when each of the options might be offered or commonly used. i.e. “When is too early or late for an epidural?” I like to use little props like the duck for “water or birthing pool” along with my “Pain Management – Sort it Out!” activity (digital product to print your own).

To explore induction and augmentation options
Similar to the comfort measures, the timeline is an excellent tool to explore which methods of induction and augmentation of labour are available locally and when along the timeline they may be offered. I like to use my induction discussion prompt cards and some props for that!

To explore the role of the birth partner along the timeline
Exploring the role of the birth partner as one of the guardians of oxytocin is an important part of many antenatal classes. Perinatal educators can use the childbirth timeline banner to help birth partners to explore their role, when they might be doing what. I like to hand out little sticky notes and a pen to everyone and then ask them to write down or draw what they might be doing when.
To explore your birth place and birth environment options along the timeline
Usually, while birth partners are exploring their role, I ask the birthing mothers/parents to explore their birth place and birth environment. I give them some questions to think about. i.e. Whereabouts will you be during early labour, established labour etc. How can you make your birthing space the most comfortable for you? Who is going to be there with you? This can then lead nicely to what they might wish to pack in their birth bag and where they might wish to give birth (home, hospital, midwife-led unit) and to think about their birth plan or preferences.
To explore how you might be feeling along the timeline
Exploring the feelings during childbirth. How might the birthing mother/parent be feeling? How does the birth partner feel? And how might the baby feel at that moment? I like to split the group into three smaller groups at that stage. Along with a different coloured set of sticky notes for each group. One colour each for baby, birthing parent and birth partner. Write down or draw faces of how they might be feeling, stick them to the banner along the timeline.
To explore helpful positions along the timeline
I use my positions for childbirth cards and ask parents to place them along the timeline.

To explore hypnobirthing techniques along the timeline
I simply ask expectant parents: “Which hypnobirthing technique or track is most helpful when?” They each get a card or piece of paper with a technique or they get a copy of a script. I then ask them “When would you use that?” each person/couple/family places their item along the timeline one at a time.
To explore breathing techniques along the timeline
Similar to most of the other ideas above, I have some printed out cards and ask parents-to-be to place them along the labour/childbirth timeline banner. Exploring which breathing techniques they may find helpful at different stages of their birthing journey.
To explore massage techniques along the timeline
Again, very similar as above my clients will also explore different massage techniques during my workshops. We will try them out together and explore which ones may be most helpful or comfortable for them during labour. Pictured here are my massage technique cards these are also available as a digital download as well as a set of worksheets (digital download).

Exploring the golden hour of childbirth
Finally, when exploring the third stage of labour (birth of the placenta) we also explore the golden hour, skin-to-skin etc including why this is helpful for the birth of the placenta, bonding with your baby, initiating breastfeeding and much more. For this exercise I use my placenta photo set (where appropriate and agreed with the group) as well as some of my newborn appearance card set (also available as digital download) pictures of skin-to-skin etc.

To create a labour/childbirth beadline, please join me for a labour beadline workshop or do my self-paced online course!
